

 There is something about the Exasperator. It seems to turn fish when nothing else will. All steelhead fly junkies have their favorite flies and for me, for many years now, the Exasperator has been my “Go To” big fly. The reason is that it simply seems to get results. Friends have also taken notice… and not just for steelhead. The Exasperator has taken its share of Chinook, largemouth and smallmouth bass, some giant browns from Eastern Washington, and lots of Alaska rainbows, among other things.
I began designing the Exasperator with the idea of creating a fly with maximum “movement” in the water. I’m a strong believer that the most important challenge confronting the steelhead fly tier is to take that big hook and turn it into something that appears alive in the water... especially with large flies.
The goal in designing the Exasperator was to maximize movement in the water by creating a vortex behind the head of the fly. This vortex causes the rabbit strip and flashy materials at the rear of the fly to flare and dance. The most important part of the Exasperator is the stiff bucktail pectoral fins that protrude out on each side of the fly. As the water is forced around these stiff pectoral fins, the vortex created makes the rabbit strip tail kick and swim in even the softest currents. The fins also do a great job of giving the Exasperator a killer, sculpin-like silhouette in even fast currents. The combination of the silhouette and the movement of the tail really give the fly the appearance of life that I believe is the key to its success.
The word, Exasperate, is defined as, “to irritate or provoke to a high degree”. On your next steelhead adventure, try the Steelhead Exasperator and I hope you can exasperate a few extra steelhead into grabbing the fly.
How to Tie the Exasperator - Black/Blue

Recommended tools: Bobbin, large hair stacker, bodkin, whip finish tool, dubbing material clip, scissors, dubbing hook, and wire cutters (if using wire for the trailing hook).

Materials:
- Rabbit strips - Black
- Flashabou - Silver
- Lite Brite - Deep Blue
- Senyo's Intruder Trailer Hook Wire - Standard - Blue (or 30lb. Berkley Fire Wire)
- Partridge Waddington Shanks - 20mm
- Gamakatsu Octopus Hooks - Size 1 or 2
- Painted Dumbbell Eyes - Medium - Pearl
- Bucktail - Black
- Not shown in photo -- Danville Monocord Thread - Black

Step 1: Secure the thread to the Waddington shank and then attach the trailing hook loop so that it extends 1.25-inches behind the shank. Secure the wire to the shank with thread wraps two-thirds of the way up the shank.
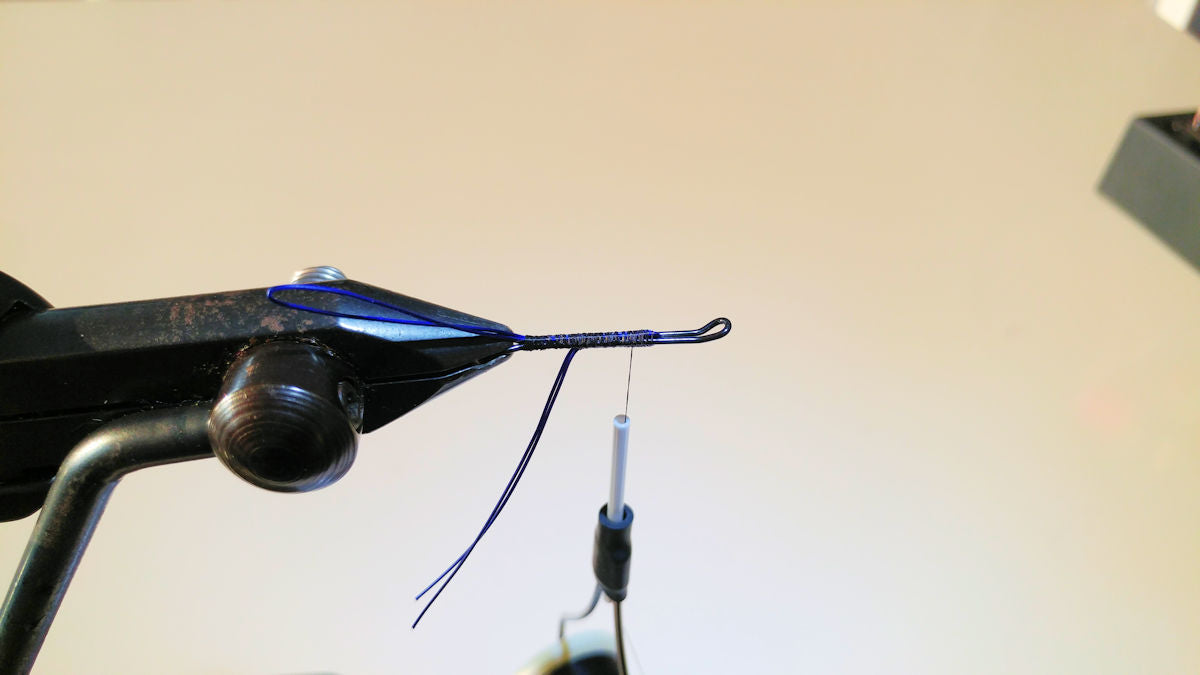
Step 2: Push the tag ends of the trailing loop material through the eye of the shank. Then pull them tight under the shank so that the loop material squeezes in between the wire of the shank. Finally, use thread wraps to secure the tag ends on the bottom of the shank and cut away excess. This method ensures the trailing loop will never pull out.

Step 3: Add the lead eyes to the bottom of the shank. Wrap them very secure with thread wraps and no glue is necessary. Leave a good amount of room between the lead eyes and the eye of the shank.

Step 4: Add approximately 10 strands of Silver Flashabou to the very back of the fly. Leave it long. We will trim the Flashabou to the desired length later.

Step 5: Using a dubbing loop, add a generous amount of Lite-Brite into the dubbing loop and spin the loop slightly. We don't want the dubbing loop spun too tightly since we'll want much of the Lite-Brite to extend back well beyond the rear of the shank.

Step 6: Wrap the Lite-Brite dubbing loop forward, pulling the material backward as your wraps move forward. End the wraps about two-thirds of the way up the shank so that there is still plenty of room behind the eyes as shown in the photo. Use your bodkin to pick out the Lite-Brite so that if flows backward as shown. Leave excess Lite-Brite long. We will trim it to length later.

Step 7: Use a clip to capture about a 3-inch section of rabbit fur off of a rabbit strip. If you don't have a clip, you can purchase one here, make your own, or use something else like a potato chip bag clip. You can use just your hands but it can be challenging.

Step 8: Use your scissors to cut the rabbit fur away from the hide. Next, with the fur still in the clip, insert the cut ends of the fur into your dubbing loop. Pull the thread loop tight and release the clip with the fur still in the loop. Begin spinning the loop with your dubbing hook as shown in the next photo.

Step 9: Spin the dubbing loop tightly so that the thread holds the rabbit fur securely. Next, we will begin wrapping the rabbit dubbing loop onto the shank.

Step 10: As you wrap the rabbit dubbing loop forward, be sure to pull the fur backwards as you wrap forwards. End the wraps with about 1/4-inch of room left behind the lead eyes.

Step 11: To begin adding the pectoral fins, first cut a section of hair off a bucktail and stack it. Stacking bucktail can be tough but the hair at the base of the bucktail is by far the easiest and works just great for the Exasperator fins. A large-sized hair stacker is best for this as well.

Step 12: Okay, here comes the most important and challenging part.... The next few steps will form one of the pectoral fins on the Exasperator. Then we will repeat for the other side. To do the first fin, take your stacked bucktail and position it behind the lead eyes and on the side of the shank. Wrap tight thread wraps so that the fin extends towards the rear and is right about 1-inch in length. This part will be a mess at first, but just get the thread wraps tight and don't worry about the mess right now.

Step 13: Once the first pectoral fin is secured to the shank, trim away the excess bucktail behind the lead eye.

Step 14: Oh yeah, we're getting to the good stuff now! Separate the bucktail from the rabbit fur and begin wrapping thread wraps around the base of the bucktail fin. Imagine you're tying a Parachute Adams and you're trying to get that post to stick up straight. In this case, we're trying to separate the pectoral fin by wrapping about ten wraps of thread right at the base of the bucktail. When you're done, the fin should stand out to the side and slightly backwards. This step is so important because the fin will need to stand up to the water current pushing against it and thereby causing the materials behind it to flare up, dance and move. If yours looks like the photo, you got it done. One more fin to go.

Step 15: Stack a second clump of bucktail and create the second fin just like we did the first one. When both fins are complete, it should look like the photo with two distinct fins that stick out on each side of the fly. Don't worry about all the thread mess. We'll cover all that up in just a couple more steps.

Step 16: Measure a section of rabbit strip and cut it so that the total length is 3.25-inches in length. This is not the length of the hide, it is the total length as you see in the photo. To this day I measure the rabbit strip length every time because I found it difficult to always get flies that looked the same.

Step 17: Starting to look like an Exasperator now! Add the rabbit strip to the top of the fly, right behind the lead eyes. Make sure you really make those thread wraps tight and the rabbit strip sits dead center on top of the fly.

Step 18: Like we did earlier, put some rabbit fur in a dubbing loop using your clip and twist it tightly to really secure the fur in the dubbing loop thread.

Step 19: Wrap the rabbit dubbing loop around the back, top, and bottom of the lead eyes. Make sure you wrap it tight and cover all around the eyes. I like my last wrap to finish just in front of the eyes and then tie it off with the main thread. Use your bodkin to pick out the fur so that the fur flows back towards the rear of the fly. Then whip finish at the head and cut the main thread. Almost done now!

Step 20: Trim away the excess Flashabou and Lite-Brite so that it is shorter than the overriding rabbit strip. Don't just cut it straight. Instead, use little snips with your scissors to cut the material at different lengths so that you get a tapered effect.

Step 21: Remove the fly from the vise and insert your hook. Wrap a small amount of thread behind the eye of the hook and add head cement. This step is important if you're using Berkley Fire Line as your trailing loop. It can be skipped if you're using wire. This step keeps the return wire portion of the eye of the hook from damaging the Fire Line over time and from keeping it from sneaking through the eye of the hook and loosing your hook!

Step 22: Squeeze the loop tight and insert it into the hook eye to attach the hook to the fly. If you have problems getting the wire through the eye of the hook, use a piece of monofilament to pull it through. Set the hook so that the hook point rides up. This will reduce snags on the bottom and promotes better hookups on the fish.

FINISHED! - Take a moment to admire your work. I hope your fly turned out great! Take a moment to watch how the Exasperator moves in the water when you get a chance to fish it. Contact us if I can help with questions and happy tying and fishing. -- Michael